Are you ready to tackle a zippered pocket? GO TEAM. WIN!!!
Today you are going to need:
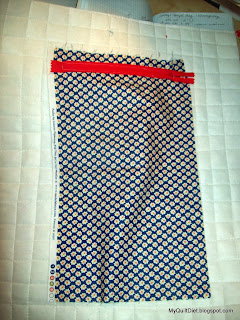
two coordinating 9" (or larger) zippers
Your two ~9"x22" zippered pocket pieces, folded in half and pressed, right sides together.
PLEASE READ THE ENTIRE POST BEFORE YOU BEGIN!!!
These instructions are from a tutorial I did over at Moda Bake Shop. You can check out the post HERE
Here are the zippered pocket basics... (specifics to this project are below)
Lay your fabric that is going to have the zipper in it, right side up on your work surface.
Take your fabric for the zippered pocket and lay it right sides together on your interior lining fabric as shown. Place the pocket fabric either 3-1/2" (for the quilted exterior pocket) or 2" (for the interior lining) below the top edge.
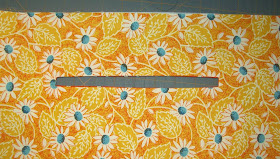
Next you will need to draw a 1/2" wide rectangle on the pocket fabric.
It should be about an inch away from the top and sides of the pocket fabric edge as shown below.
Pin and sew on the drawn skinny rectangle you have drawn.
Now for a bit of snip snip.
Please cut carefully, with sharp scissor,s down the center of the long rectangle, through both layers of fabric, stopping a 1/2" before the end.
At the end, you will want to cut a "v" shaped cut up to, but not through, the corner stitching of the rectangle.
Now, shove your pocket fabric through the new cut opening to the back side of the interior lining fabric.
Get it all though :)
...and press :)
At this point, you may have to "make" the pocket lining behave.
Tug and press and don't burn your fingers! :)
Take your zipper and lay it behind your interior lining so you can see it.
Carefully pin the zipper into place. This can take a bit of patience, as the zipper sometimes likes to wiggle ;D
Carefully top stitch around the edge of the opening to attach the zipper.
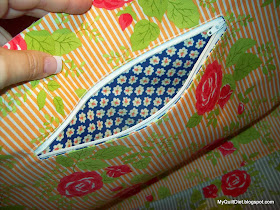
Yippee! It's in!
A view from the back side.
Now to sew up the zipper pocket. Fold up the zippered pocket fabric so the bottom meets up with the top.
Another shot.
Pin only the pocket fabric together. Do not pin the pocket fabric to the bag's interior lining fabric.
Fold back the interior lining fabric to expose the zippered pocket fabric.
Sew shut using a 1/4" seam allowance.
Repeat for the other two sides of the zippered pocket. (The bottom of the zippered pocket is a fold, so it won't need to be sewn :) BONUS!!!)
Once your zippered pocket is all sewn shut, sew right along the top, top stitch seam above the zipper.
This keeps the pocket from sagging inside the bag lining.
Can I get a WHOOP WHOOP??? You just made a zippered pocket!!!
SPECIFICS FOR THE TEMPLE BAG!!!
Now for our bag, there will be a few differences.
After you have trimmed your quilted exterior panel, you need to decide which side will be your back side, the one that will have the zippered pocket, and not be covered up by the flap ;)
Be sure that you place the top edge of the pocket lining fabric about 2-1/2" down from the top edge of the exterior bag edge.
Because of the blue lining fabric, it is REALLY hard to see the lines, and such... the above pics may show you a better view of what is going on ;D
Don't worry if the quilted panel is being a bit of a jerk. Just man handle it, and it will eventually give in ;)
Now repeat for the interior lining zippered pocket :)
Remember, the top edge of the pocket lining should be about 2" from the top edge of the interior lining.
Now your zippered pockets are finished :)
On Instagram use #MQDtemplebagQAL and #MyQuiltDiet to share your progress:)
Check the schedule for the QAL HERE. Visit all post's tagged Temple Bag Qal HERE
**** As a special side note, if you live anywhere close to Payson, Utah, we will be doing this project together on the 23rd of January. Please message me if you would like information about coming to sew with us :) No creepy murderers, please ;D
***One of my quilty BFF's is an Embroidery Guru! She has templates for many of the LDS temples :) She will embroider an LDS temple for your bag, if you'd like :) It is $5 if she already has the template, and $10 if she needs to order it. Please leave me a comment, if you are interested. Be sure that you are not a "no reply blogger" or I cannot get your info to her :( If you are not sure if you are a "no reply blogger" please include your email in your comment. One hint that you might be a "no reply blogger" is if I never reply to your comments :(:::.....


I love this tutorial! OMG! You make it so simple and yet so professional looking. I have to make some of these bags for my daughters and nieces!!! They will love them! Thank you! (Sorry for all the exclamations, I'm just so excited for this!) ;)
ReplyDeleteFantastic, thanks a ton!
ReplyDelete